Friday, December 30, 2011

Factory Method Pattern in Python

Ok, here we go again. This time, I will demonstrate Factory Method Design Pattern  


Let's say we need to design a module to retrieve 4 statistics counters, 
  1. Bytes Transmitted 
  2. Bytes Received
  3. Packet Transmitted
  4. Packets Received
So, we start with creating a base class and 4 inherited classes:


1:  class StatsClass(object):  
2:    
3:    def __init__(self):  
4:      self._counter = 0  
5:      self._name ="Abtract Statistics Class"  
6:        
7:    def Get_Name(self):  
8:      return self._name  
9:      
10:    def Get(self):  
11:      return self._counter;  
12:      
13:    def Reset(self):  
14:      self._counter = 0;  
15:      
16:    def Set(self,counter):  
17:      self._counter = counter;  
18:        
19:    def PollFromHw(self):  
20:      print(self._name, "is poll statistics counter from hardware register")  
21:      
22:    
23:  class StatsBytesTransmitted(StatsClass):  
24:    def __init__(self):  
25:      self._name = "Bytes Transmitted"  
26:      self._counter = 0    
27:    
28:  class StatsBytesReceived(StatsClass):  
29:    def __init__(self):  
30:      self._name = "Bytes Received"  
31:      self._counter = 0  
32:    
33:  class StatsPacketsTransmitted(StatsClass):  
34:    def __init__(self):  
35:      self._name = "Packets Transmitted"  
36:      self._counter = 0  
37:      
38:  class StatsPacketsReceived(StatsClass):  
39:    def __init__(self):  
40:      self._name = "Packets Received"  
41:      self._counter = 0  
42:        


Then, create a Factory Class


1:  # Factory Class  
2:  class AbstractStatsFactory():  
3:    def CreateStats(self,strStats):  
4:      pass  
5:    
6:  class StatsFactory(AbstractStatsFactory):  
7:    def CreateStats(self,strStats):  
8:      if( strStats == "Bytes Received"):  
9:        StatsObj = StatsBytesReceived()  
10:      elif ( strStats == "Bytes Transmitted"):  
11:        StatsObj = StatsBytesTransmitted()  
12:      elif ( strStats == "Packets Transmitted"):  
13:        StatsObj = StatsPacketsTransmitted()    
14:      elif ( strStats == "Packets Received"):  
15:        StatsObj = StatsPacketsReceived()    
16:      else:  
17:        StatsObj = None    
18:    
19:      return StatsObj  


Now, let's put them into use


1:  def Use_StatsObj(StatsObj):   
2:    StatsObj.PollFromHw()  
3:    StatsObj.Set(100)  
4:    print(StatsObj.Get_Name(), "counter is ", StatsObj.Get())    
5:    StatsObj.Reset()  
6:    print(StatsObj.Get_Name(), "counter Reset. Now counter is ", StatsObj.Get())    
7:    
8:    
9:    
10:  strStats = "Bytes Received"  
11:  StatsObj = StatsFactory().CreateStats(strStats)  
12:  Use_StatsObj(StatsObj)  
13:    
14:  strStats = "Bytes Transmitted"  
15:  StatsObj = StatsFactory().CreateStats(strStats)  
16:  Use_StatsObj(StatsObj)  


The output is 
 Bytes Received is poll statistics counter from hardware register  
 Bytes Received counter is 100  
 Bytes Received counter Reset. Now counter is 0  
 Bytes Transmitted is poll statistics counter from hardware register  
 Bytes Transmitted counter is 100  
 Bytes Transmitted counter Reset. Now counter is 0  


No bad so far, though, I am not satisfied.

There is still an if-elif-else statement in the StatsFactory Class. It will be nice if the Factory class knows how many Statistics Objects are there, without explicitly instantiated these concrete objects .


In OO theme, you can use Reflection to do so.  In Python, this is how I implement it


1:  class StatsFactory2(AbstractStatsFactory):  
2:    def CreateStats(self,strStats):  
3:      # Get all subclass  
4:      for childClass in StatsClass.__subclasses__() :  
5:        obj = childClass()  
6:        if( strStats == obj.Get_Name()):  
7:          return obj  
8:    def ListStatsObjNames(self):  
9:      objList = list()  
10:      for childClass in StatsClass.__subclasses__() :  
11:        # print(childClass)  
12:        obj = childClass()  
13:        objList.append(obj.Get_Name())  
14:      return objList   
15:        
16:    


Now, it's time to put the code into test


1:  print("--- now use New Factory --- ")  
2:  strStats = "Bytes Received"  
3:  StatsObj = StatsFactory2().CreateStats(strStats)  
4:  Use_StatsObj(StatsObj)  
5:    
6:  print("Counter can be read: ", StatsFactory2().ListStatsObjNames())  
7:  while(True):  
8:    strStats = input("Which counter do you want to know ?");  
9:    StatsObj = StatsFactory2().CreateStats(strStats)  
10:    if( StatsObj == None ):  
11:      break  
12:    Use_StatsObj(StatsObj)  
13:    


This is the Output


 --- now use New Factory ---   
 Bytes Received is poll statistics counter from hardware register  
 Bytes Received counter is 100  
 Bytes Received counter Reset. Now counter is 0  
 Counter can be read: ['Bytes Transmitted', 'Bytes Received', 'Packets Transmitted', 'Packets Received']  
 Which counter do you want to know ?Bytes Transmitted  
 Bytes Transmitted is poll statistics counter from hardware register  
 Bytes Transmitted counter is 100  
 Bytes Transmitted counter Reset. Now counter is 0  


Now, this is beauty part -- let's add two new statistics counters right after the  StatsPacketsReceived 


1:  class StatsFcsError(StatsClass):  
2:    def __init__(self):  
3:      self._name = "Fcs Error"  
4:      self._counter = 0  
5:    
6:  class StatsDiscardPacket(StatsClass):  
7:    def __init__(self):  
8:      self._name = "Discard Packets"  
9:      self._counter = 0    
10:    


Then, run my test code without any change. Voila, the two new classes are automatically recognized and can be used. 


 --- now use New Factory ---   
 Bytes Received is poll statistics counter from hardware register  
 Bytes Received counter is 100  
 Bytes Received counter Reset. Now counter is 0  
 Counter can be read: ['Bytes Transmitted', 'Bytes Received', 'Packets Transmitted', 'Packets Received', 'Fcs Error', 'Discard Packets']  
 Which counter do you want to know ?Discard Packets  
 Discard Packets is poll statistics counter from hardware register  
 Discard Packets counter is 100  
 Discard Packets counter Reset. Now counter is 0  
 Which counter do you want to know ?  


Beautiful, isn't it ?

Wednesday, December 28, 2011

Decorator Pattern in Python

I re-read Head-First Design Pattern lately. And decide to implement Decorator Design Pattern in Python.


The following is based on the example from the book

  1. The existing code has base class Beverage, and subclass DarkRoast, Espresso. These code has been fully tested and in production (line 1-21). 
  2. Three months later, your boss want to have more varieties of drink, .e.g Whip Cream, Vanilla. So, you need to write more code to support that.
  3. It's best to use Decorator Design Pattern, as it obeys the OCP(Open-Closed) Principle. (line 24-51)
  4. Mocha, WhipCream, Vanilla are all decorator class.


Source Code

1:  class Beverage:  
2:    """ beverage class """  
3:    def __init__(self):  
4:      self._desc = "Abstract Drink"  
5:      self._cost = 0.0  
6:      
7:    def get_cost(self):  
8:      return self._cost  
9:      
10:    def get_desc(self):  
11:      return self._desc  
12:      
13:  class DarkRoast(Beverage):  
14:    def __init__(self):  
15:      self._cost = 3.5  
16:      self._desc = "Dark Roast ($" + str(self._cost) + ")"  
17:          
18:  class Espresso(Beverage):  
19:    def __init__(self):  
20:      self._cost = 3.0  
21:      self._desc = "Espresso ($" + str(self._cost)+ ")"  
22:    
23:    
24:  # Design Pattern   
25:  # Abstract Decorator  
26:  class Condiments(Beverage):  
27:    def __init__(self):  
28:      self._desc = "Abstract Condiments class"  
29:      self._cost_condiment = 0.0      
30:      
31:  class Mocha(Condiments):  
32:    def __init__(self, beverage):  
33:      self._cost_condiment = 1.0  
34:      self._beverage = beverage;      
35:      self._desc = "Mocha($"+ str(self._cost_condiment)+ ") " + self._beverage.get_desc()   
36:      self._cost = self._cost_condiment + self._beverage.get_cost()   
37:        
38:  class Vanilla(Condiments):  
39:    def __init__(self, beverage):  
40:      self._cost_condiment = 0.6  
41:      self._beverage = beverage;      
42:      self._desc = "Vanilla($"+ str(self._cost_condiment)+ ") " + self._beverage.get_desc()   
43:      self._cost = 0.6 + self._beverage.get_cost()   
44:           
45:    
46:  class WhipCream(Condiments):  
47:    def __init__(self,beverage):  
48:      self._cost_condiment = 0.4  
49:      self._beverage = beverage;      
50:      self._desc = "WhipCream($"+ str(self._cost_condiment)+ ") " + self._beverage.get_desc()   
51:      self._cost = 0.4 + self._beverage.get_cost()   
52:        
53:  ########################################################################################3    
54:    
55:    
56:  b = DarkRoast()  
57:  print(b.get_desc(), "Cost is", b.get_cost())      
58:    
59:  b = Mocha(DarkRoast())  
60:  print(b.get_desc(), "Cost is", b.get_cost())    
61:    
62:  b = Mocha(Espresso())  
63:  print(b.get_desc(), "Cost is", b.get_cost())    
64:    
65:  b = Vanilla(DarkRoast())  
66:  print(b.get_desc(), "Cost is", b.get_cost())   
67:    
68:  b = Vanilla(Mocha(DarkRoast()))  
69:  print(b.get_desc(), "Cost is", b.get_cost())   
70:    
71:  b = WhipCream(Mocha(DarkRoast()))  
72:  print(b.get_desc(), "Cost is", b.get_cost())   
73:    
74:    
75:  b = Vanilla(WhipCream(Mocha(DarkRoast())))  
76:  print(b.get_desc(), "Cost is", b.get_cost())   
77:    


Output

 Dark Roast ($3.5) Cost is 3.5  
 Mocha($1.0) Dark Roast ($3.5) Cost is 4.5  
 Mocha($1.0) Espresso ($3.0) Cost is 4.0  
 Vanilla($0.6) Dark Roast ($3.5) Cost is 4.1  
 Vanilla($0.6) Mocha($1.0) Dark Roast ($3.5) Cost is 5.1  
 WhipCream($0.4) Mocha($1.0) Dark Roast ($3.5) Cost is 4.9  
 Vanilla($0.6) WhipCream($0.4) Mocha($1.0) Dark Roast ($3.5) Cost is 5.5  


Why not using Python built-in Decorator ?

This is good question. My reasons are

  1. You have to modify the existing code. In the source code above, you have to add @decorator in DarkRoast or Espresso class. With Decorator Design Pattern, you don't have to modify existing code. 
  2. You cannot undo the @decorator during run-time. Once it's there, it's there forever. If you use Decorator Design Pattern, you still can enjoy the original espresso. :)


Wednesday, November 30, 2011

PMI-ACP Certification Exam Experience Requirements Spreadsheet

I am in the process of getting PMI-ACP certification. According to PMI, you would need at least 1500 hours working on agile project teams, and these hours must be earned in last two years. 


In my journey of preparation, I created a spreadsheet to calculate hours spent in Agile Project Management Experience. I am sharing here to help others to prep for this certification.


Please note that, this spreadsheet will ONLY calculate Agile Project Experience. It does NOT cover general project management experience. There are lots of resource on internet to help you to calculate general project management experience. You can google search "pmp experience spreadsheet" to find one suitable for you.


Down from here : PMI-ACP Agile Experience Worksheet 

  1. Click the link, then select menu "File"->"Download original". Your browser will prompt you to save an excel spreadsheet file.
  2. You need Excel 2007 and above. Or, you can directly edit it if you have google account.


Saturday, August 13, 2011

Install Python Code Coverage in Ubuntu 11.04

Just started to learn using Python on Linux. For me, the most troubling stuffs is to get the program installed over Linux.


Anyhow, these are prerequisites,

  • You have Python installed. Ubuntu comes with Python2.7. But, you can install Python 3.2 following another post 
  • Python Setuptools. If you don't have this, you can install it by 
  • $ sudo apt-get install python-setuptools


These are steps to install Python Code Coverage
  1. Download the Python Code Coverage from http://pypi.python.org/pypi/coverage. As of writing, the version is 3.5
  2. extract the tarball to a folder, .e.g. ~/Downloads/coverage-3.5
  3. In Ubuntu, the default python is 2.7. It will install to /usr/local/lib/python2.7/dist-packages/
newgear@ubuntu:~/Downloads/coverage-3.5$ sudo python setup.py install -v

Or, you can do this to install to Python 3.2. It will install to /usr/local/lib/python3.2/dist-packages/

newgear@ubuntu:~/Downloads/coverage-3.5$ sudo python3.2 setup.py install -v

Monday, August 8, 2011

Install Python 3.2 on Ubuntu 11.04

Ubuntu comes with Python 2.7, but I want to try out Python 3.2.x. After some google searches, I cannot just remove Python 2.7 and install 3.2.x, as Ubuntu's other modules requires 2.7


But, you can have Python 3.2.x coexist with Python  2.7. This is how:


Launch Ubuntu Software Center, then search Python 3.2. Select Python 3.2 and install


After that, you can run Python 3.2 in terminal like this


newgear@ubuntu:~$ python3.2
Python 3.2 (r32:88445, Mar 25 2011, 19:28:28) 
[GCC 4.5.2] on linux2
Type "help", "copyright", "credits" or "license" for more information.
>>> 
>>> import sys
>>> sys.version_info
sys.version_info(major=3, minor=2, micro=0, releaselevel='final', serial=0)


Friday, August 5, 2011

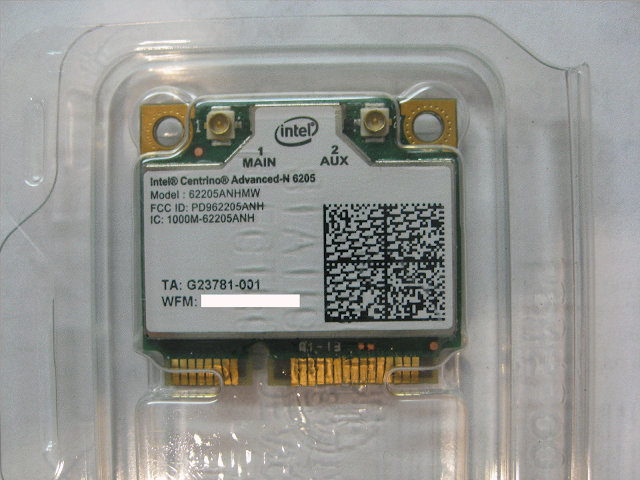
ASUS U43JC: Upgrade to Intel Advanced-N 6205 or 6200 Wireless Card

I just recently upgraded the my ASUS U43JC's wireless card to Intel Advanced N 6205. The benefit, comparing to stock Intel Wireless 1000 card, is

  1. Support dual band: 62xx support both 2.4Ghz and 5Hz frequency band.
  2. Better wireless performance:
    • 1000 is 1x2 300mbps receive, 150mbps transmit
    • 6200 is 2x2 300mbps receive, 300mbps transmit


Instructions

  1. Buy a compatible wireless card : The ASUS U43JC has only two antennas, so your best bet is Intel 62xx series. 6300 would need 3 antennas, hence it will be waste -- unless you want to mod your U43JC to add a 3rd antenna.  You have several options on 62xx,
    1. 6200 and 6205: Reading the product brief, I did not see any differences in terms of feature sets. So, I end up buying Intel Advanced-N 6205 (62205AN.HMWWB) from ebay for $18 + $4 shipping, as it's the cheaper than 6200. 
    2. 6230: has integrated Bluetooth. If you want  Bluetooth option, you can try this. Though I have NOT tested it.
    3. 6250: has WiMax. Don't know if this will work. Plus, I don't need WiMax servies anyway.
  2. Download software and driverGoogle "intel wireless 6205 driver download" should lead the Intel Driver download site. My U43JC is running Windows 7, 64 bits, so I downloaded "ICS_s64.exe".
  3. Remove Screws : Remove battery, and disconnect power adapter first. Then, start to removes all screws. The screws are in various sizes,  so make sure you keep track where the screws are removed. I lined them up on the table, just like the orientation on the notebook. 
    1. Remove all the visible screws in the back.
    2. Remove DVD burner,  the screws behind the DVD burner  
    3. Take out hard drive bay cover, and hard driver. Then, remove the screws behind the hard drive.
    4. Take out memory bay cover, and remove the screws near the memory
    5. Remove the screws behind the two rubber feet near the hinge.
  4. Lift up the keyboard
    1. Starting from the corner, I use a plastic card to pry open the keyboard slowly. You only need little force to lift up the entire keyboard. If it gets stuck, it is more likely the screws are not completely removed.
  5. Replace the wireless card
    1. You don't have to remove any ribbon cables. Remove the 2 screws around the  wireless card and antenna cables. Then, replace with new card.
  6. Install Driver and Testing
    1. Temporarily put back the hard drive, connects to the power adapter. Your U43JC will boot up, then install the new software driver. After the software driver installation completed, do some testing to make sure the new card is good. In my master bedroom, I used to get poor reception. With the new card, I can get around 24Mbps speed.
  7. Put the screws back.
    1. At this point, you are all set. Just put everything back, Hard Disk, DVD burner, and .. etc.